Sunday, September 16, 2012

Another Mojo Monday Challenge - 258

My mojo has sort of flown out the window this week. So what better way to light that spark of imagination than to participate in a Mojo Monday challenge.


I stamped the house images from the Sending Holiday Cheer on Stampin' Up Whisper White cardstock and on various patterned papers from the Echo Park Very Merry Christmas 6x6 paper pack. 


I fussy cut select parts from each color.

 
I paper pieced each house.


Using a Sakura White gel pen, I added the window details. I used the Red and Lime Stardust pens to color the lights along the top of the green house, and bow and wreath on the doors.

 
I fussy cut each house out from the white paper.


Using the Spellbinders Classic Circle, I cut a piece of Whisper White. Using the Scallop Circle dies, I cut a piece of patterned paper. I inked the white circle using Tumbled Glass Distress Ink. I adhered these together.


I attached the houses in the back directly to the circle and used dimensional adhesive to attache the smaller house in the front.


To mimic snow, I added Marvey Liquid Applique to the roof of each house as well as to the base of each, forming "snow drifts." I sprinkled glitter diamond glitter on the Liquid Applique before heating with my heat tool.

 
I added this to my card base using dimensional adhesive. The sentiment is from the same stamp set. I stamped it, matted it and attached with dimensional adhesives. I ink a couple of chipboard snowflakes from Maya Road with white pigment ink. I added the diamond glitter and attached them to the from of the card as well.

 
I had so much fun making this card. I stared at 10:00 a.m. and next thing I knew it was 1:30. Took quite a bit of time, but well worth it.
 
Thanks for stopping by and happy crafting,
Dana Desmond

Thursday, September 6, 2012

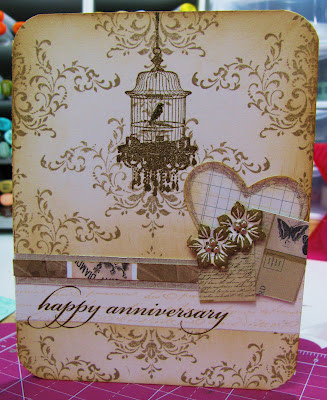
STAMPtember Anniversay Card

Just a quick post to share a card I made using mostly stamps and plain cardstock. The base of the card is Very Vanilla cardstock from Stampin' Up. I stamped the background using a stamp from the Bliss set from Stampin' Up and used ink to distress the edges of the card.

 
The bird cage is from a My Mind's Eye stamp set I received in a Simon Says Stamp card kit. I think it's called Charming, but not sure.

 
The sentiment is a from a Simon Says Stamp set and the patterned paper is from My Mind's Eye. Both were also part of a Simon Says Stamp card kit.

 
I punched the heart from a piece of patterned paper and outlined it with a Sakura Stardust gel pen. I stamped the flowers from the same Bliss stamp set, cut them out and used a stylus on the back of the flowers to curve the petals backward to give them dimension. I added cream pearls from CTMH. The patterned paper behind the flowers are scraps from one of the pieces of patterned paper.
 
 
This card style is a little different for me. I typically don't stamp the background, but I enjoyed making it and will definitely try this again.
 
Thanks for stopping by and happy crafting,
Dana Desmond

Monday, September 3, 2012

Celebrating My Favorite Holiday with a Mojo Monday Challenge

My most favorite holiday of the year, HALLOWEEN. Maybe its because I'm an October baby or possibly because it's so darn FUN! Either way, I love to make Halloween cards. Unfortunately, Halloween isn't a huge card giving holiday.  
 
So, I'm always looking for a good reason to do a Halloween project and when I opened my e-mail this morning and got a look at this week's Mojo Monday sketch, I knew that was the perfect reason.


Since I was a Stampin' Up demonstrator this past year (no longer part of that crew), all of my Halloween supplies are from Stampin' Up. I started by stamping this sweet image from Greeting Card Kids with Momento Tuxedo Black on Copic X-Press It cardstock. I colored it with Copic markers. Using Classic Circles Spellbinders Dies and Classic Scallops Dies, I cut the image, mat and scalloped circle.

 
I followed the sketch pretty closely.


I couldn't find flowers in my stash that were the right color. So, I used a couple of EK Success punches and made my own. The leaves were created using a flower punch from Stampin' Up.


A Sakura Star Dust pen was the perfect tool to add sparkly stars to the night sky. I imaged the light coming from the upper left and figured the highlights wouldn't be too strong because it's night. I'm not the greatest when it comes to light direction, but I'm trying to do a light study on all of my images before I start coloring (biggest thing I learned in my Intermediate Copic Class). 

 
I add another flower and a sentiment (Studio G from Wal-mart).

 
I love how this turned out and will probably take this to work as part of my Halloween decorations.
 
Thanks for stopping by and happy crafting,
Dana Desmond
 
Materials
 
Stampin' Up - Cardstock (Rich Razzelberry, Old Olive, Pumpkin Pie) Patterned Paper, Greeting Card Kids stamp, Rich Razzelberry  Satin Ribbon, Brads
Spellbinders - Classic Circles die, Classic Scallop die
Punches - EK Success Retro Flower Large, Retro Flower Small, Embossed Scallop
Momento Tuxedo Black Ink
Copic Markers
Sakura Star Dust Gel Pen
 

Saturday, September 1, 2012

Bucks and Trucks...

Sometimes inspiration flies into your head and if you act on it immediately, you can come up with the most amazing things. The key, don't wait, create.

That's what I did with this wall hanging I created for my nephew's birthday. His party was scheduled for 2:00 p.m. I prefer to give my family handmade gifts, but time was ticking. So, the plan was to stop by the store on our way and pick up his gift.

At 10:00 a.m. this idea popped into my head. I rushed down to my craft area and started creating with fury. Result, a major hit with my nephew.

 
I started with an 8x10 frame that was matted to 5x7. I stamped the tree image on Very Vanilla cardstock. I used a combination of Distress Ink and Stampin' Up ink to create the sky and grass. This was then adhered to the back of the black mat.

 
All images were purchased from the Silhouette online store. I cut the saying from one of the fonts on my computer.
 
 
I really wanted to give a lot of dimension, so the words "and, that's, how" are adhered flat to the back layer. The words "Bucks, Trucks, Anthony, Rolls!" are popped up on Dimensionals. The deer is layered on the black mat and popped up off the background. 


The truck and hill are attached to the front mat and triple popped up from the background.

 
I inked each layer of the hill to give it a little more dimension.
 
 
The finishing touch was stamping the trees onto the front mat. I really enjoy making these home decor items. I can let my imagination run with type of craft.
 
Thanks for stopping by and happy crafting,
 
Dana Desmond
 
Products:
 
Silhouette Cameo
Stampin' Up
  • Very Vanilla Cardstock
  • Old Olive Classic Ink
  • Baja Breeze Classic Ink
  • Lovely as a Tree stamp set
  • Old Olive Marker
  • Always Artichoke Marker
  • Early Espresso Marker
Distress Ink Tumbled Glass
Tombo Monomulti Glue
Frame from Hobby Lobby