Sunday, February 27, 2011

Papertrey Ink Card Elements

A few weeks ago, Papertrey Ink provided us crafters with a set of printable tags that were to be used in a project challenge. Unfortunately, the time frame for the challenge was about 1 day, so I wasn't able to participate. But I love the tags, so when I got time, I started playing with them.


Here's a card using one of the tags. I printed two copies of the tag and used clear embossing powder on one of them. Once the tag was cool, I cut out the center sentiment and attached it to the non-embossed tag. I cut around the tag, added pearls and set it aside.


I embossed the top portion of a piece of Ocean Tides card stock from Papertrey Ink.


I added a piece of crocheted lace from my stash. I layered a piece of Aqua Mist Ribbon from Papertrey Ink on top of the lace. I attached all of this on a Aqua Mist card base. I finished off by popping up the sentiment tag.

I've started working with the other tags from this set, so you can expect to see more.

Thanks for stopping by,
Dana Desmond

Thanks for stopping by.

Saturday, February 26, 2011

Peachy Keen Stamp Challenge #46

I'm back with another Peachy Keen Stamp challenge submission. The sketch for this challenge can be found at http://peachykeenstampschallenge.blogspot.com/.

 All papers are Papertrey Ink. The patterned paper is from the Egg Hunt pack. I used my Gypsy to weld the shadows of the duck and umbrella. I cut this in light blue. I cut the remaining layers, inked the edges using Stampin' Up Classic ink and assembled the focal point.


I used Peachy Keen Critter Faces PK-745 for the duck's face. I used my white Gelly Roll pen to color the eyes and add stitching to the umbrella. I colored the beak with a colored pencil. The raindrops are epoxy stickers I found at Michael's  for $.49.


The sentiment is from The Paper Studio-Card Sayings. I used my Spellbinders Labels to cut, emboss and ink the tag. I ran a strip of Papertrey Ink ribbon around the focal point.

This card could be used for so many purposes. It would make a great baby card.

Thanks for stopping by,
Dana Desmond

Tuesday, February 22, 2011

ATCs Experiments with Embossing Techniques

Today's ATC cards are a little different than the one's I posted earlier. All of these, I started with a white piece of paper and used a combination of dye ink, versamark, and clear embossing powder.

I started by embossing  a stamped image on the white paper using clear embossing powder. I added ink to the paper using the ink resist technique. Then I would clear emboss another image on top of the inked paper. Then add another color of ink, before embossing another image. The results were cool.


On this one, I experimented with some embossing techniques. First I inked the stamp with Versamark ink, then I lightly  inked it with some inexpensive dye inks, then stamped it on the page. I added clear embossing powder. This is a good way to improvise when you don't have very many different colors of embossing powder.

On this one, I started with a dirty stamp before inking it with Versamark. The sentiment was stamped in white craft ink and embossed with clear glitter powder.


If you're interested in trading, comment on this post and we can work something out.

Thanks for stopping by,
Dana Desmond

Monday, February 21, 2011

More ATCs with Metallic Embossing

Here's a few more ATCs I made over the weekend. I'm having so much fun with these. Since these use a small amount of materials, I'm a little more willing to experiment with new techniques.


This one is made out of leftovers from my Valentine's project. The ticket stamp and die set is from Papertrey Ink, but I added the word Foxy from 40:31 Creations Love stamp set.

The key and heart stamps are from two completely different sets, but they work so well together. I embossed them using bronze powder. The background paper is brown packing paper from one of my Papertrey Ink shipments. Using clear embossing powder, I added the text. Then I stamped the key image using Tim Holtz Distress ink in Antique Linen. To give the entire card an aged look, I used my Tsukineko walnu ink spritz before I added my elements.

If you are interested in trading ATCs, leave a comment and we will work something out.

Thanks for stopping by,
Dana Desmond

Sunday, February 20, 2011

ATC Weekend

I've discovered the world of Artist Trading Cards. ATCs are so appealing because it allows me to experiment with new techniques and to explore work from other artists. Before I start trading I want to build a supply of cards.

For those of you not familiar with ATCs, there are a few rules that must be followed before a card can be called a true ATC. It must measure 2 1/2" x 3 1/2". It must be your original work or a photograph of your original work. It must be good quality materials with all elements attached securely. The card must include basic information about you and the materials/techniques used. ATCs can never be sold and when traded, the trade must be fair, meaning it's a card for card trade.

Yesterday, I went to my craft area, pulled paper from my scrap box, and just started playing.

I used Papertrey Ink cardstock so the card base was plenty strong. Aleen's Tacky Glue was used as the main adhesive. In a few places I used Glossy Accents.


This stamp is from Stampin' Up. After I colored the rabbit and pot with my Copic Markers, I used my Versamark Pen and embossed the rabbit using clear embossing powder. I realized I don't have a good grass stamp, so I used my water color pencils to make the grass. I embossed the flowers in red and added a pearl center.
 

I love this bee stamp. After coloring the bee with colored pencils, I used Glossy Accent on the yellow parts and Stickles on the wings. I used colored pencils to add a little shading to the wings as well.
 

I after coloring the flower image with water color penicls, I used my aqua painter to blend the colors. Then I added clear embossing powder to the largest flower so it would stand out in the foreground. Then I popped this up on the card. I used clear embossing powder on the bee image.


This is a very simple card. I used the Laugh With Me Quotes stamp set from Fiskars. The lace is stamped using White Craft in from Stampin' Up. I punched the pink circles,added the stamped flower and put a pearl in the center of each. The sentiment block is popped up off the card.
  I have several other cards I will be posting over the next few days. If you are interested in trading with me, just leave a comment on this post and we can arrange something. Unfortunately, I can only trade within the US, no international trades for now.

Thanks for stopping by,
Dana Desmond

Wednesday, February 16, 2011

My Pink Stamper Blog Hop Project

Here's a 4x4 card I made that could be used for many different occasions. I made the background using white cardstock, post-it note cut into a cloud shape, and Tim Holtz Distess Ink in Tumbled Glass.

 The ballon is cut from the Create-a-Critter cartridge. The sentiment is from 40:31 Creations Love stamp set.

The face is from the Everyday Faces from Peachy Keen Stamps(sorry about the glare).

Thanks for stopping by,
Dana Desmond

Sunday, February 13, 2011

Valentines Art Project

eatThis project is a little different than anything I've ever done. It's been in the back of my mind for quite a while. I knew I wanted a red and black corset to be the focal point. I wasn't sure what else I wanted to add, but when I got started everything just came together.


I started by making all the elements for this project. I looked on the internet for a good image of a corset, but I couldn't find one. So, I freehand cut one out of  paper from the DCWV Autumn stack. I used my Versamark pen and and Ranger black embossing powder to add the boneing. I distress the edges with Tim Holtz Distress Ink Pad inVintage Photo. I didn't have a piece of black lace, so I used black ink to die a piece of off white crochet lace. I added this to the bottom of the corset and set it aside. 


I made the tickets by die cutting Rustic cardstock with the Papertrey Ink ticket die. I stamped it with stamps from the Just The Ticket stamp set, adding the word Foxy from the 40:31 Creations Love stamp set. When they were combined, I liked the little naughty message it created.


I found this high heel shoe stamp in the $1 bin at Michaels yesterday. I started with a piece of the same Rustic paper I used for the background of the project. Using Tim Holtz Distress ink, I stamped the text backgroung with a new Stampendous stamp I bought last week. I embossed the shoe in black and the word Sexy in gold. I really wanted the word Sexy to be in a script font, but all I had was block letters from Fiscars. So I used the kiss method to grundge them up a little before stamping and embossing. I tore around the images and distressed with Vintage Photo Distress ink.


I decided it need a little bling, because bling is sexy. I happened to have this lock and key on a chain and thought it was perfect.
  
On a piece of 7x6 craft wood, I added a piece of white core textured card stock over the wood and sanded the edges and distressed the surface. I used Tim Holtz Distress in in Vintage Photo to darkent the edges and  embossed the swirl background in gold. I used my Smooch Spray to distress the lace,background Rustic paper, and flowers. I added all of this onto the background board.

This is by far my favorite project so far. I have it displayed in my living room. The colors are perfect, now if my husband would just let me paint our white living room dark red, it would be perfect.

I also made a large tote bag for a coworker this weekend, but it needs a few more details. I haven't quite decided what I want to do. Maybe I will finish it and have it posted later this week.

Thanks for stopping by,
Dana Desmond

Friday, February 11, 2011

Quick Note...

If you are looking for project ideas with a little comic relief, my cousin Mandy has a blog you might want to check out. She isn't specifically a paper crafter, but her crafting style is more the home decore/recycle materials, type stuff. She tries to make her projects as inexpensive as possible. The results have been awesome. This year she's challenged herself to make at least one Christmas project a week for the next year. She also plans to throw in a few other projects as well. Sounds a little crazy to me, but hey, she calls herself the Crazy Crafting Chic, what else would you expect.

Not only does she post projects, but she always adds a little commentary about her crazy life. It's just her, her husband and a teenage son in the house. Quite comical at times.

Go check out her blog, http://tsmomma.blogspot.com/, you won't be sorry you did.

Thanks for stopping by,
Dana Desmond

Wednesday, February 9, 2011

WOOHOO!! Just a few lines to brag

I couldn't believe it when I opened my e-mail and saw I was the winner of the Peachy Keen LFIF X's and O's challenge (Here's my winning entry). I can't wait to receive my prize. There were so many great entries, I didn't think I had a chance. How awesome!!! I'm having a hard time wiping the smile off of my face. LOVE MY PEACHY KEEN STAMPS.

This is just the "wind in my sails" moment I needed to get motivated. So, craft room, here I come!

Dana ;-)

P.S. I've been eyeballing Emma's new stamps over at My Creative Time. From what I understand, they are made by the same company as Peachy Keen Stamps, so you know they are great quality. Emma's stamps have some very cute sayings that would work on many different projects.

It's been a while...

The weather has just thrown me all off. I've been working extra hours to make up for the time I had to take off for the blizzard we had here last week. I did get a few cards done while I was off, but I didn't get them posted.

I tried to go down and craft last night, but I spent all my time running up and down the stairs trying to cook supper, make a snack for snack day at work and clean the kitchen. I finally gave up.


I've informed my family that starting Friday night, I will be spending all my time in my craft room and I don't plan to resurface until Sunday.
 
Here's a few of the Valentine's cards I worked on while the blizzard was happening. It was so cold in our basement, but I managed to brave it long enough to make these.
 
This one is my favorite. I'm going to make more
of these in different colors and patterns.


The blue one was another happy accident. I cut the heart out of white paper and added the same swirl stamp to it that I used on the background, but the image was too delicate and there wasn't enough surface area on the heart to tell what it was. So, instead of cutting the heart again, I used my Pacific Point stamp pad and completely saturated the heart with ink. I found that the edges of the image picked up more ink that the center, giving it an outlined look. I still wasn't happy with the results. So I covered the whole surface with Versamark Dazzle ink and used clear sparkle embossing powder over the entire surface. When this was cool, I repeated the process. I love the iridescent look it gave. 


All cards are 4x4 and use Stampin' Up cardstock. I've found that it cuts the best on my Cricut. While at my Stampin' Up club meet a couple of weeks ago, I learned a new aluminum foil technique and had to try it. I love how it turned out. I had a little trouble on the card with the stacked hearts. I put too much glue on the foil and it "popped" though the front, so I sprinkled glitter over the glue. It turned out OK, but the next time I used the foil, I put just enough glue to make it slightly sticky and it worked better.

I used my Gypsy to plan these about a month ago and I can't remember all the different cartridges I used. I know for sure I used were Doodle Charms, Gypsy Wandering and Create-a-Critter.

Thanks for stopping by. I promise I will do my best to keep up with my posting. Have a great day!
Dana Desmond

Tuesday, February 1, 2011

Happy Accidents

Today consisted of house cleaning, watching movies, web surfing and, in just a bit, some crafting. But first, I want to share a card I made over the weekend. This is another card that I just lost myself in. I started with a blank piece of white cardstock and each element I added just brought it alive. I have to say most of what I did was just happy accidents. Nothing was planned, but somehow it all came together. As I type this, I'm watching a huge blizzard outside my window. Yes, an official blizzard. There's so much snow blowing off of my roof, I can't see past my front porch. One of the best parts of a blizzard is that everyone is home, safe and sound.

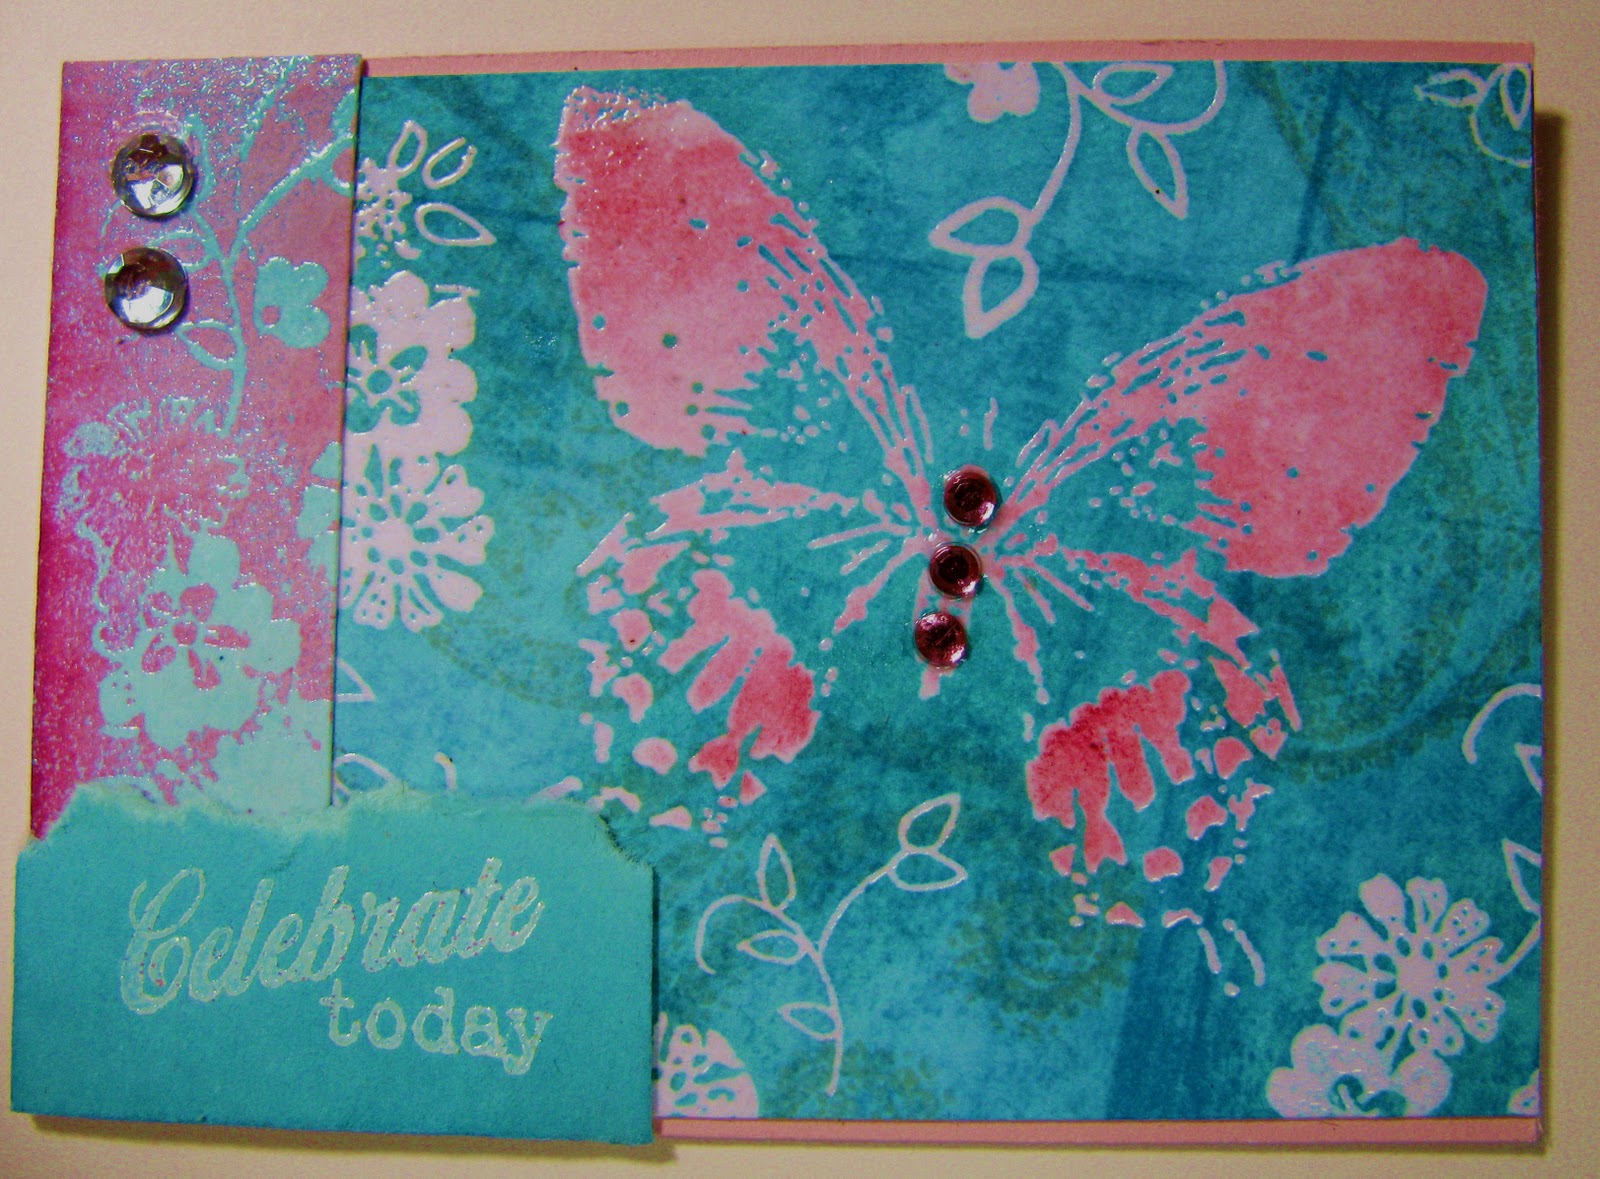
First I stamped the cherry blossoms using what I thought was going to be clear glitter embossing powder. Apparently, I hadn't cleaned the stamp properly, so when I stamped the image in Versamark I got a variegated pink tone. At first I was a little bummed about, but I added the embossing powder anyway. I loved how it turned out. I decided I wanted to have a soft sky effect, using Tim Holtz Distress Ink in Tumbled Glass, I used my blending tool added the blue, making sure I stayed darker around the edges.


I stamped the butterfly image from Martha Stewart  in Versamark and embossed it using navy embossing powder I had in my stash. I also embossed the edges using the same navy powder. I did this similar to the way you would ink up the edges of a card to give it an aged look, only I used Versmark.


I felt the cherry blossoms needed more color, so I used my Copic Sketch Markers and added purple, brown and green. I cut slits in the paper, keeping to the contour of the butterfly, making sure my ribbon would fit through it. Using Papertrey ribbon, I thread it through the slits, behind the butterfly and attached the ends to the back of the card.

I used the "love is in the air" stamp from the 40:31 Creations Love stamp set. I added silver brads to each corner and layered this onto a piece of white cardstock.

I used Papertrey Ink cardstock in Enchanted Evening for the card base. Lastly, I added the butterfly layer to the card base.

I have to admit, at first, I didn't really like the Distress Inks. I didn't understand what made them different. But now that I've started using them and am not so intimidated by them, I love how they look. They give a very soft effect to anything you use them on.

Now, it's off to the basement to make another purse for a friend and to work on some Valentine's cards for coworkers. I'll try my best to post something tomorrow.

Thanks for stopping by,
Dana Desmond