Monday, October 31, 2011

UTEE embossed image.


I stamped the image on Whisper White cardstock and used my blender pen and Classic Ink pads to color the image. Then I double embossed the entire image with UTEE.


Materials

Papers and cardstock: Stampin' Up
Stamps: Stampin' Up
Punches: Stampin' Up
Embellishments: The Paper Studio
Tools: Distressing tool from Stampin' Up

Thanks for stopping by,
Dana Desmond

Sunday, October 30, 2011

Glowing Moon Halloween Card

I started by sponging the background with Stampin' Up ink.


Then I used my Stamp-a-ma-Jig to line up the image over the stamped background.


At first I was a little disappointed by how the house is lighter in front of the moon, but I think it gives an eerie glow to the card.

Materials

Papers: Stampin' Up
Ink: Stampin' Up
Punches: Stampin' Up
Embellishments: The Paper Studio

Thanks for stopping by,
Dana Desmond

Saturday, October 29, 2011

Happy Pumpkins

Happy Pumpkins under a Halloween moon.


All paper and stamps are from Stampin' Up.


Background is embossed with the Swirls Cuttlebug folder. The grass is punched with a Fiskars grass punch.

Thanks for stopping by,
Dana Desmond

Friday, October 28, 2011

Lonely Halloween Owl

This image and patterned paper is from Stampin' Up.


I first cut the image to the correct size. I sponged the background using Daffodil Delight, Cajun Craze, and Old Olive ink from Stampin' Up.


I stamped the image on the sponged background.

Materials

Patterned Paper and Cardstock: Stampin' Up
Stamps: Stampin' Up
Ink: Stampin' Up
Embellishment: Wal-mart

Thanks for stopping by,
Dana Desmond

Thursday, October 27, 2011

Vintage Halloween

I made this card a few months ago, but I don't think I published it. The sentiment is from Stampin' Up. I punched the sentiment block with Stampin' Up punches.


The image is from Stampin' Up's Greeting Card Kids set. I used the paper collection to paper piece the image. I colored the skin, broom, hair, and grass with Copic markers.


Patterned paper is from Basic Grey.


Thanks for stopping by,
Dana Desmond

Wednesday, October 26, 2011

Halloween Sentiment using Shrinky Dinks and Stamps

This card started as an experiment with Shrinky Dinks. First I punched 1" circles out of white Shrinky Dink sheet. Then I colored them with Pumpkin Pie ink from Stampin' Up and stamped the letters on with Basic Black.


I used my heat gun to shrink each one. I then added Crystal Effects to each and set them aside to dry.


Materials

Patterned Paper and Cardstock: Stampin' Up
Stamps: StudioG
Ink: Stampin' Up
Embellishments: The Paper Studio, Crystal Effects from Stampin' Up
Tools: Crop-a-Dile from Stampin' Up


Thanks for stopping by,
Dana Desmond

Tuesday, October 25, 2011

Flocked Bats and a Simple Image

Halloween card #3. This one uses flocked paper from Stampin' Up. It took me a while to decide what to do with this paper. The bats were so huge, any image I tried to pair with it just didn't work. Then I found this 31st image. It works well with the bat background.


Materials

Patterned Paper: Stampin' Up
Cardstock: Stampin' Up
Stamp: StudioG
Ink: Versamark
Embossing Powder: Ranger
Punches: Martha Stewart
Embellishments: The Paper Studio
Other Tools: Distressing Tool from Stampin' Up


Thanks for stopping by,
Dana Desmond

Monday, October 24, 2011

Spooky Halloween Card

Another Halloween card. Did I mention this is my favorite holiday?


Materials

Patterned Paper: Stampin' Up
Cardstock: Stampin' Up
Images: StudioG
Ink: Stampin' Up
Embellishment: Gelly Roll

Thanks for stopping by,
Dana

Sunday, October 23, 2011

Eat, Drink, and be Scarey

It's been a while since I created any cards, but with my favorite holiday coming up, I just couldn't resist making some spooky cards. I will be posting a new card each day until Halloween. I had tons of fun creating these cards.


The main image is from the Pick Your Poison pattered paper currently in the Holiday Mini catalog from Stampin' Up.


Materials


Patterned Paper: Stampin' Up
Cardstock: Stampin' Up
Sentiment: StudioG
Ink: Stampin' Up
Embellishment: Stickles by Ranger

Thanks for stopping by,
Dana

Saturday, October 8, 2011

My First Mini Album

This is my most favorite paper ever. It's Mariposa from DCWV. I used my Cinch to bind it. This mini album has lots of real estate for photos.


Front Cover - I used Grunge Paper colored with Stampin' Up's Real Red ink and a Tim Holtz Hitch Post.

Inside Front Cover and Page 1 - This is a waterfall page.

Water fall in motion.

Page 2 and 2 1/2

Pages 2 3/4 and 3

Pages 4 and 5 - This page has a hidden pull out tag.

Pull out tag in motion.

Pages 6 and 7 - This page also has a hidden tag.

But this one comes out of the top.

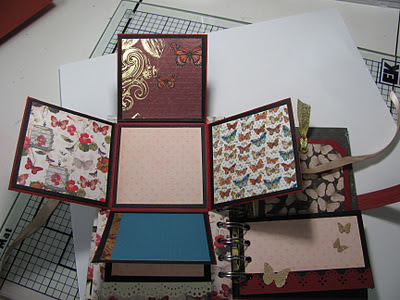
Page 8 and 9 - This page is very interactive. It's a block fold that will hold 9 photos.

Block fold in motion - Opening flap #1

Opening flap #2

Opening flap #3

All flaps open

Back Cover - I used a Stampin' Up Antique Brad to hold the strap on the back.

Short post with lots of photos. I hope you enjoyed my first mini album. I've made a couple more since then and love them even more than this one.

Thanks for stopping by,

Dana Desmond

Thursday, October 6, 2011

Just Signed Up to be a Stampin' Up Demonstrator!!!

If you look at many of my blog projects, you will see that I use Stampin' Up products all the time. I'm going to be building another blog that relates only to Stampin' Up products, but in the meantime, you can purchase products and have them delivered to your home, by visiting my new Stampin' Up website: http://www.stampinup.net/esuite/home/danadesmond/ or give me a call and we can talk about setting up a party.

I'll still be posting my projects on this blog. I just want to keep my Stampin' Up stuff separate, so there's no confusion as to when I've competed a 100% Stampin' Up project. So, see you in many places on the Internet and hopefully in person at a workshop!

Thanks for stopping by,
Dana Desmond