Wednesday, December 21, 2011

Peaceful Snow Card

Just a quick and simple card today. I used my Gypsy to create the snowflake border. I cut the border and the word Peace out of DCWV glitter cardstock.

I cut the shadows out of Baja Breeze cardstock from Stampin' Up. I used my Snowflake Cuttlebug folder to emboss the background, layered this on another piece of Baja Breeze cardstock, and added a ribbon. I attached this to a standard A2 card base.


Thanks for Stopping by and Happy Crafting!
Dana Desmond

Sunday, December 18, 2011

Vintage Father Christmas Card

This card turned out so good, I'm thinking about matting it and putting it in a beautiful frame and add it to my Holiday decorations. I believe both of these stamps are from Stampendous, but I'm not exactly sure. If not, I'll post a corrections.


I used Crumb Cake ink from Stampin' Up to stamp the background Christmas Collage on Vintage Cream cardstock. I matted this onto Baja Breeze and Soft Suede.

I tied a bow with a cream colored satin ribbon from my stash.

I stamped the Father Christmas on Vintage Cream in Soft Suede. I used a Blush Blossom marker to color his skin and Baja Breeze marker to color his eyes. I used my aqua pen and lightly brushed over the beard and eyebrows to add a little softness. I layer this on Baja Breeze and Soft Suede. Using Dimensionals, I popped this up a little off center of the background. I added this whole piece to a Vintage Cream card base.

Thanks for stopping by and Happy Crafting!
Dana Desmond

Monday, December 12, 2011

Snow Swirled Tree Card

This tree was cut from the Christmas Cricut cartridge at 4 1/2 inches. I used DCWV white glitter paper for the snow bank across the bottom of the card, the "snow swirls" on the tree and for the snowflakes, which were punched with a $.97 snowflake punch from StudioG.


The second layer of the swirls on the tree was cut out of Baja Breeze cardstock from Stampin' Up. The tree background was cut from Wild Wasabi from Stampin' Up. I received this sentiment free in a sample magazine a few months ago, but I can't remember what company makes it. I embossed the sentiment using Versamark and white powder. I punched it out with the small oval punch from Stampin' Up and layered it onto a piece of the glitter paper that I had punched with an oval punch, also from Stampin' Up. I added ribbon from my stash and adhered the snowflakes.


The background is a piece of Baja Breeze cardstock that I ran through my Swiss Dots Cuttlebug folder. Then I lightly rubbed my Dazzle Versamark ink pad across the raised dots so they would standout a little better.

Stay tuned for more post of Holiday cards.

Thanks for Stopping by and Happy Crafting,

Dana Desmond

Sunday, December 11, 2011

Step Card Merry Crittermas Scene

I cut this card in a "reverse" step, meaning I used the smaller portion to make the step feature, rather than the larger portion, which is common.


The animal images are from Stampin' Up's Crittermas set. Background snowflakes are from Serene Snowflakes by Stampin' Up. The tree is from Studio G and the sentiment is from CTMH.


I used Copic Markers to color all images.


Materials

Stamps: Stampin' Up, Studio G, and CTMH
Cardstock: Stampin' Up
Ink: Versamark, Stampin' Up
Glitter: Stampin' Up
Tools: Copic Markers

Thanks for Stopping by. Happy Crafting!
Dana Desmond

Saturday, December 10, 2011

Winter Wonderland of Holiday Cards

Last night I dreamed about making all kinds of Christmas cards. I woke up at 4:30 a.m. and couldn't quit thinking about it (can we say OCD). So, around 6:00 a.m. I finally got up, grabbed a cup of coffee and headed to my craft room.

As you can see, I made quite a bit of progress. I'm going to post photos of each card over the next few days. Let's start with the first card. I'm going to enter this card in the whimsical-designs.com winter fun challenge.

I used Stampin' Up images from the Christmas Lodge, Winter Post and You're a Gem stamp sets. I used Stampin' Up cardstock in Whisper White, Baja Breeze and Marina Mist. I added glitter cardstock from DCWV.

I stamped the image of the skaters on a 4 x 5 1/4 inch Whisper White cardstock using Basic Black ink from Stampin' Up. I colored the image using Stampin' Up markers in Soft Suede, Cherry Cobbler, Baja Breeze, Old Olive and Blush


I stamped the tree image on the same piece of Whisper White, using Old Olive ink. Then I used Baja Breeze ink and a blending tool from Tim Holtz to add a bit of color to the sky. I used a mask in the background to give the look of a snow-covered hillside.
I added snow with Liquid Applique from CTMH. I heated it with my heat tool. While it was still tacky, I sprinkled the snow with Dazzling Diamonds.
I matted this on a piece of Baja Breeze and added it to a white card base.
Check back for information about the other cards I created today. I also have about 6 more card projects saved in my Gypsy as well as 5 or 6 designs in my head. I probably should sketch them out before I forget. Unfortunately, that's now how I work. I never really know what I'm going to do until I sit down and get into my creative zone.

Thanks for Stopping by and Happy Crafting!
Dana Desmond

Monday, November 21, 2011

Christmas Card-a-Day #7

The patterned paper behind the window gave me the idea for this card. It looks like a field of trees on a winter day. The background paper is embossed with the Vintage Wallpaper folder from Stampin' Up.

I used my square punch to punch the windows in the soft suede cardstock from Stampin' Up.


I rounded the corners of the window image and cut a small strip for the sill. I used Stampin' Ups ticket corner punch to make the trim at the bottom of the window and then popped it up on Dimensionals.

Materials

Paper: Papertrey Ink
Cardstock: Stampin' Up (Real Red, Soft Suede, Whisper White)
Stamps: Stampin' Up (Stitched Stockings, Wood Grain Background)
Ink: Stampin' Up (Cherry Cobbler, Garden Green, Chocolate Chip)
Punches: Stampin' Up (1 1/4" square, Stitched Stockings Builder, Ticket corner, 3/16" rounded corner)
Embossing: Stampin' Up (Vintage Wallpaper)
Embellishment: Stampin' Up (Pearls)

Thanks for stopping by,
Dana Desmond

Sunday, November 20, 2011

Christmas Card-a-Day #6

This card was made with the new Christmas Lodge stamp set currently in the Stampin' Up Holiday Mini Catalog.

I used my markers to get a multi-colored image from the sentiment stamp. I only have a few of the Stampin' Up markers, but I think I'm going to order the entire set.


Materials

Cardstock: Stampin' Up (Old Olive, Crumb Cake, Cherry Cobbler, Vintage Cream)
Ink: Stampin' Up (Versamark, Crumb Cake, Old Olive), Stampin' Up markers (Old Olive, Early Espresso)
Tools: Stampin' Up (Ticket Punch, Paper Piercer, Simply Scored)
Embellishments: Stickles, The Paper Studio

Thanks for stopping by,
Dana Desmond

Saturday, November 19, 2011

Christmas Card-a-Day #5

I got the idea for this design from the Kristina Werner's Holiday Card series. I modified it a bit.

I think the stamp is from Stampability. The ornament strip is actually a border sticker from the Letters to Santa patterned paper set from Stampin' Up.


I used Versamark ink for the background and heat embossed the focal sentiment in white.
Materials

Cardstock: Stampin' Up (Old Olive, Crumb Cake, Chocolate Chip)
Ink: Stampin' Up (Versamark)
Stamp: Stampabilities
Stickers: Stampin' Up (Letters to Santa)
Embossing Powder: Stampin' Up
Button: Stampin' Up
Tools: Stampin' Up (Simply Scored, Heat Tool, Stamp-a-ma-Jig)

Thanks for stopping by,
Dana Desmond

Friday, November 18, 2011

Christmas Card-a-Day #4

This is one of the most simple cards I've ever made, but I love the impact of the snowflake image.


I used silver embossing powder and the Serene Snowflakes stamp set from Stampin' Up. I also embossed the edges of each of the paper layers.


Materials

Papers: Papertrey Ink
Cardstock: Stampin' Up
Stamp: Stampin' Up
Ink: Versamark
Embossing powder: Stampin' Up
Embellishment: Stampin' Up

Thanks for stopping by,
Dana Desmond

Thursday, November 17, 2011

Christmas Card-a-Day #3

This card uses the Stampin' Up Delightful Decorations and the coordinating Ornament Punch. It also incorporates the watermark stamping technique.


I began by stamping the ornament image on the Crumb Cake cardstock base with Versamark ink. Then I stamped the same image on Whisper White with Cherry Cobbler ink and Crumb Cake ink. I punched the Cherry Cobbler ornament with the Ornament punch and punched the center of the Crumb Cake ornament using a one inch circle punch. I added a piece of gold ribbon to the Cherry Cobbler ornament. Using Dimensionals, I adhered the Crumb Cake ornament circle to the center of the Cherry Cobbler ornament and used Dimensionals to adhere the entire piece to the base cardstock.


Materials

Cardstock: Stampin' Up
Ink: Versamark, Stampin' Up
Stamps: Stampin' Up
Punches: Stampin' Up
Embellishments: Stash


Thanks for stopping by,
Dana Desmond

Wednesday, November 16, 2011

Christmas Card-a-Day #2

Today's card uses another awesome Stampin' Up stamp set and coordinating punch.


The stocking bodies were punched from Papertrey Ink paper. The white trim was stamped and embossed with white embossing powder on red cardstock. They were punched using the Stitched Stockings punch from Stampin' Up and adhered to the stocking bodies.


I used my scoring board to create "bricks" on the background cardstock.

Materials

Paper and Cardstocks: Papertrey Ink
Stamps and Punches: Stampin' Up
Tools: Score Board from Stampin' Up
Embellishments: The Paper Studio


Thanks for stopping by,
Dana Desmond

Tuesday, November 15, 2011

Christmas Card-a-Day #1

Welcome to Day #1 of my card-a-day Christmas series. I had so much fun with the Halloween series, I just couldn't resist doing one for Christmas.


Two of these images are stamped and then punched using the Ornament punch from Stampin' Up. The other ornament is punched from Papertrey Ink patterned paper. This punch is very versatile. It can be used for so many things, not just Christmas ornaments.


Materials

Paper and Cardstock: Papertrey Ink
Stamps: Stampin' Up
Punches: Stampin' Up
Embellishments: Wal-mart and stash

Thanks for stopping by,
Dana Desmond

Saturday, November 12, 2011

Holiday Card-a-day Coming on November 15th

Just a short note to let you know I will be posting a week's worth of Holiday cards beginning November 15th. I had so much fun making Halloween cards, I thought I would do it again for the Holidays.

Thanks for stopping by,
Dana Desmond

Monday, October 31, 2011

UTEE embossed image.


I stamped the image on Whisper White cardstock and used my blender pen and Classic Ink pads to color the image. Then I double embossed the entire image with UTEE.


Materials

Papers and cardstock: Stampin' Up
Stamps: Stampin' Up
Punches: Stampin' Up
Embellishments: The Paper Studio
Tools: Distressing tool from Stampin' Up

Thanks for stopping by,
Dana Desmond

Sunday, October 30, 2011

Glowing Moon Halloween Card

I started by sponging the background with Stampin' Up ink.


Then I used my Stamp-a-ma-Jig to line up the image over the stamped background.


At first I was a little disappointed by how the house is lighter in front of the moon, but I think it gives an eerie glow to the card.

Materials

Papers: Stampin' Up
Ink: Stampin' Up
Punches: Stampin' Up
Embellishments: The Paper Studio

Thanks for stopping by,
Dana Desmond

Saturday, October 29, 2011

Happy Pumpkins

Happy Pumpkins under a Halloween moon.


All paper and stamps are from Stampin' Up.


Background is embossed with the Swirls Cuttlebug folder. The grass is punched with a Fiskars grass punch.

Thanks for stopping by,
Dana Desmond

Friday, October 28, 2011

Lonely Halloween Owl

This image and patterned paper is from Stampin' Up.


I first cut the image to the correct size. I sponged the background using Daffodil Delight, Cajun Craze, and Old Olive ink from Stampin' Up.


I stamped the image on the sponged background.

Materials

Patterned Paper and Cardstock: Stampin' Up
Stamps: Stampin' Up
Ink: Stampin' Up
Embellishment: Wal-mart

Thanks for stopping by,
Dana Desmond

Thursday, October 27, 2011

Vintage Halloween

I made this card a few months ago, but I don't think I published it. The sentiment is from Stampin' Up. I punched the sentiment block with Stampin' Up punches.


The image is from Stampin' Up's Greeting Card Kids set. I used the paper collection to paper piece the image. I colored the skin, broom, hair, and grass with Copic markers.


Patterned paper is from Basic Grey.


Thanks for stopping by,
Dana Desmond

Wednesday, October 26, 2011

Halloween Sentiment using Shrinky Dinks and Stamps

This card started as an experiment with Shrinky Dinks. First I punched 1" circles out of white Shrinky Dink sheet. Then I colored them with Pumpkin Pie ink from Stampin' Up and stamped the letters on with Basic Black.


I used my heat gun to shrink each one. I then added Crystal Effects to each and set them aside to dry.


Materials

Patterned Paper and Cardstock: Stampin' Up
Stamps: StudioG
Ink: Stampin' Up
Embellishments: The Paper Studio, Crystal Effects from Stampin' Up
Tools: Crop-a-Dile from Stampin' Up


Thanks for stopping by,
Dana Desmond

Tuesday, October 25, 2011

Flocked Bats and a Simple Image

Halloween card #3. This one uses flocked paper from Stampin' Up. It took me a while to decide what to do with this paper. The bats were so huge, any image I tried to pair with it just didn't work. Then I found this 31st image. It works well with the bat background.


Materials

Patterned Paper: Stampin' Up
Cardstock: Stampin' Up
Stamp: StudioG
Ink: Versamark
Embossing Powder: Ranger
Punches: Martha Stewart
Embellishments: The Paper Studio
Other Tools: Distressing Tool from Stampin' Up


Thanks for stopping by,
Dana Desmond

Monday, October 24, 2011

Spooky Halloween Card

Another Halloween card. Did I mention this is my favorite holiday?


Materials

Patterned Paper: Stampin' Up
Cardstock: Stampin' Up
Images: StudioG
Ink: Stampin' Up
Embellishment: Gelly Roll

Thanks for stopping by,
Dana

Sunday, October 23, 2011

Eat, Drink, and be Scarey

It's been a while since I created any cards, but with my favorite holiday coming up, I just couldn't resist making some spooky cards. I will be posting a new card each day until Halloween. I had tons of fun creating these cards.


The main image is from the Pick Your Poison pattered paper currently in the Holiday Mini catalog from Stampin' Up.


Materials


Patterned Paper: Stampin' Up
Cardstock: Stampin' Up
Sentiment: StudioG
Ink: Stampin' Up
Embellishment: Stickles by Ranger

Thanks for stopping by,
Dana

Saturday, October 8, 2011

My First Mini Album

This is my most favorite paper ever. It's Mariposa from DCWV. I used my Cinch to bind it. This mini album has lots of real estate for photos.


Front Cover - I used Grunge Paper colored with Stampin' Up's Real Red ink and a Tim Holtz Hitch Post.

Inside Front Cover and Page 1 - This is a waterfall page.

Water fall in motion.

Page 2 and 2 1/2

Pages 2 3/4 and 3

Pages 4 and 5 - This page has a hidden pull out tag.

Pull out tag in motion.

Pages 6 and 7 - This page also has a hidden tag.

But this one comes out of the top.

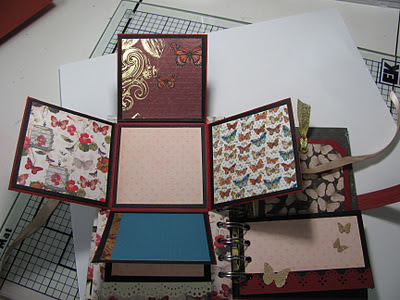
Page 8 and 9 - This page is very interactive. It's a block fold that will hold 9 photos.

Block fold in motion - Opening flap #1

Opening flap #2

Opening flap #3

All flaps open

Back Cover - I used a Stampin' Up Antique Brad to hold the strap on the back.

Short post with lots of photos. I hope you enjoyed my first mini album. I've made a couple more since then and love them even more than this one.

Thanks for stopping by,

Dana Desmond