Wednesday, December 5, 2012

Sledding with Friends...and Penny Black

Today's card features a fun stamp from Penny Black's Christmas Everyday clear stamps set and My Mind's Eye 12 Days of Christmas 6 x 6 patterned papers.


I stamped the image on 120# watercolor paper with Stazon ink.


I used my Stampin' Up markers to watercolor the image.


I added thin lines of Marvy's Liquid Applique under the image to resemble snow. I lightly sprinkled this with glitter before heating with my heat gun.


The sentiment is from Penny Black's Christmas with Mimi clear stamp set. I used a Stampin' Up punch to punch the snowflake out of white cardstock, attached it and the sentiment with a Stampin' Up Glimmer brad and finished it of with Stardust Stickles.

This card is one of my favorites this year. I just love the idea of Teddy taking his friends to play in the snow. Such a happy thought.


Thanks for stopping by and happy crafting,
Dana Desmond

Tuesday, December 4, 2012

Christmas Love...with Penny Black

Another watercoloring card today.
 
 
I stamped these images from Penny Black 120# watercolor paper. It is actually 3 separate stamps in one set. The image of the birds in the tree wasn't tall enough to make an entire tree, so I extending the tree trunk using my Copic multi-liners. You really can't tell unless you look very closely.


I then stamped the heart and holly image so it appeared the bird was holding it in its beak. Then I stamped the snowman under the branch. I watercolored the entire image using Stampin' Up markers and a waterbrush.
 
 
I used my Silhoette to cut the doilie and circles. I inked the edge of the top circle with Stampin' Up's Real Red ink. I added the shimmer lace from my stash to both the image and the circle element.
 
Thanks for stopping by and happy crafting,
Dana Desmond


Materials
Stamps: Penny Black, Stampin' Up
Patterned Papers: Bo Bunny
Ink: Stazon, Stampin' Up
Embellishements: Stampin' Up
Tools: Silhouette Cameo
 

Monday, December 3, 2012

Penguine Love with Penny Black


What is it about penguins that make people happy? I just love them on Christmas projects. I decided to step away from the Copics and try my had at watercoloring.
 
 
I stamped the image on #120 watercolor paper with Stazon black ink. Watercolor by nature is a little rough, but if you turn it to the back, it's a little smoother which makes stamping easier.


I used my Stampin' Up markers and a water brush to color this image. To be honest, the Stampin' Up markers are a little tricky when used like this. They tend to dry quickly and don't rewet very easily. I really want the Tim Holtz Distress Markers for water coloring. I've used the distress inks and feel they work much better for water coloring. I just don't have enough of a color palette to use them exclusively.


The sentiment is from Stamin' Up. I white embossed the image on a piece of Soft Suede cardstock.

Thanks for stopping by and happy crafting,
Dana Desmond


Materials
 
Stamps: Penny Black, Stampin' Up
Patterned Paper: Bo Bunny
Cardstock: Stampin' Up
Ink: Stazon, Versamark, Stampin' Up
Embellishements: Stampin' Up Ribbon and brads


Sunday, December 2, 2012

Jolly Christmas Fun

I just love these fun images from Penny Black's Jolly Follies stamp set.
 
 
I tried my hand at coloring radiating light. Not sure I achieved the achieved the exact look I was going for, but it's a start.
 
I added stardust Stickles to the interior light.

 
I think these two images are a perfect pair. I tried to be aware of the radiating light on this image as well. I added warm tones to the right of the image and cool tones to the left. It looks much better in person (these pics were taken in bad lighting with my iPhone. Misplaced camera and all that jazz.)

 
I added a couple of dimensional snowbanks and stamped the sentiment before I attached them with pop dots. I fussy cut all images and popped the up on each layer.
 
This card is so much fun. I love the expression on each of the character's face.
 
Materials
Stamps: Penny Black
Cardstock: Papertrey Ink
Patterned Paper: Scraps from my stash
Ink: Momento, Copic
Embellishments: Stickles 

Saturday, December 1, 2012

Twas the Night Before Christmas...with Penny Black

I made this card several weeks ago and never got around to posting (I have tons of cards I haven't posted). I'm having a difficult time getting into the Christmas Spirit. After reading the many blogs I follow, others seem to be having the same issue. I'm not sure what the problem is this year, but I figured making Christmas cards might help. So, I've been coloring and crafting away.
 
I love this Penny Black image. Reminds me of "Twas the night before Christmas."


I started by stamping the image on Copic X-Press It cardstock with Momento Tuxedo Black Ink. I colored the sweet mouse image with Copic Markers.

 
The Stampin' Up sentiment is stamped with Cherry Cobbler ink and punched using Stampin' Up's Word Window punch and layered on a piece of Soft Suede punched with the Modern Label punch.
 
 
The sentiment inside the card is from Stampin' Up as well.

 
I did notice I should have inked the edges of the cardstock. The white core is showing on some of the patterned papers. Oh well, next time.
 
 
Thanks for stopping by and happy crafting,
Dana Desmond

 
Materials
Stamps: Penny Black, Stampin' Up
Cardstock: Stampin' Up
Pattern Paper: Bo Bunny
Tools: Stampin' Up - Scallop Border Punch, Word Window Punch, Modern Label Punch, Doilie Die, Paper Piercer
Ink: Momento, Stampin' Up, Copic Markers, Sakura White Gelly Roll pen
Embellishments: The Paper Studio 
 

Saturday, November 17, 2012

Lawn Fawn Ornate Ornaments

Today's card is a nostalgic card made using Lawn Fawn's Ornate Ornaments stamp set and Very Merry 6x6 paper pad by Echo Park. When the package containing this paper pad came in the mail, the mailman put the package on the front porch (even though I told him repeatedly to put them in the garage) and the neighborhood dogs DESTROYED the package and another package that arrived the same day (can we say furious). I still have pink letter stickers all over my yard and stuck to my driveway, that was back in August, I believe. Anyway. All but one sheet of the paper  (diamond pattern in the background of this card) in this pack was ripped in half, so it was a bit of a challenge to figure out how to use these papers.
 
 
First I stamped the branch image on a piece of the patterned paper. The paper was already torn, so I went with it and added that to my card. I added the background test piece over this.

 
I embossed the ornament images in white on several pieces of patterned paper and cut them out. I added the silver embossing powder to the ornament toppers using my Versamarker to apply the embossing ink. I embossed the stripe of the round ornament on a second piece of paper and pieced it over the green ornament. I added rhinestones to both pieces and popped them up on the background.


I added crochet twine using m paper piercer and tied that into bows.

 
I decorated the inside of the card using scraps from the front of the card. The sentiment is also from the stamp set.
 
 
Despite the paper distruction challenge, I had a lot of fun creating this card.


Thanks for stopping by and happy crafting,
Dana Desmond

Sunday, November 11, 2012

Cranberries, Popcorn and Snowman

I've been making cards like mad the last few weeks and will post them over the next few days.
 
Today's card features CC Designs Sweet November Adorn D. Yard Rubber image. I began by stamping this adorable snowman on Copic X-Press It cardstock with Momento Tuxedo Black ink.
 
 
I colored the image with Copic Marker. I paper pieced the hat and scarf with paper from Lily Bee Designs Jingle 6x6 paper pad. I used C-1 and C-3 Copic Marker to give the paper pieced areas more dimension. 

 
The sentiment is actually one stamp, but I wanted it in two colors. So, I stamped it twice on a piece of paper from the paper pad using Cherry Cobbler and Old Olive ink. I punched the green image with a scalloped circle punch and the red image with a 1 3/8" circle punch. I layered the two images and popped them up.
 
 
I added pearl accents and added the entire image to a Very Vanilla card base.


Materials
 
Image: CC Designs Sweet November Adorn D. Yard Rubber Stamp
Sentiment: Stampin' Up
Patterned Paper: Lily Bee Designs Jingle 6x6 paper pad
Cardstock: Stampin' Up Cherry Cobbler and Very Vanilla
Ink: Momento Tuxedo Black, Stampin' Up Cherry Cobbler and Old Olive
Markers: Copic
Punches: Stampin' Up
Pearls: Stampin' Up
Trim: May Arts

Monday, November 5, 2012

MoJo Monday Challenge 266

After a long break, I'm back with a MoJo Monday card challenge. I colored this CC Designs Ice Cream Lucy stamp a few weeks ago and couldn't find the right project for her to call home, until now.

 
I colored the image with Copic Markers.

 
All papers are from My Mind's Eye Vanity Fair 6x6 pack.
 
 
Materials
  • Stamps: CC Designs Ice Cream Lucy, Amy R Sweet Sentiments
  • Cardstock: Stampin' Up Very Vanilla
  • Patterned Paper: My Mind's Eye Vanity Fair
  • Ink: Momento Tuxedo Black and Desert Sand, Distress Vintage Photo
  • Flower: Prima
  • Tools: Stampin' Up Scallop Border Punch, Cuttlebug Swiss Dots
Thanks for stopping by and happy crafting,
Dana Desmond

Tuesday, October 9, 2012

MIA

I apologize for being MIA. My laptop crashed and I've been trying to reload all my files on to my new one. All of my pictures and Silhouette files are stuck in the old laptop, which is very sad, as I had just finished designing all of my Christmas Cards the night before it crashed. I think everything is still there, I just need to take it somewhere and have the files transfered to another hard drive. I hope to post a new project soon. I'm planning to do a card-a-day Halloween series next week.

On an up note, my new laptop is much faster than my old one, so that means I make be able to do video tutorials. Stay tuned. We may be in for a fun ride.

Thanks for stopping by and happy crafting,
Dana Desmond

Sunday, September 16, 2012

Another Mojo Monday Challenge - 258

My mojo has sort of flown out the window this week. So what better way to light that spark of imagination than to participate in a Mojo Monday challenge.


I stamped the house images from the Sending Holiday Cheer on Stampin' Up Whisper White cardstock and on various patterned papers from the Echo Park Very Merry Christmas 6x6 paper pack. 


I fussy cut select parts from each color.

 
I paper pieced each house.


Using a Sakura White gel pen, I added the window details. I used the Red and Lime Stardust pens to color the lights along the top of the green house, and bow and wreath on the doors.

 
I fussy cut each house out from the white paper.


Using the Spellbinders Classic Circle, I cut a piece of Whisper White. Using the Scallop Circle dies, I cut a piece of patterned paper. I inked the white circle using Tumbled Glass Distress Ink. I adhered these together.


I attached the houses in the back directly to the circle and used dimensional adhesive to attache the smaller house in the front.


To mimic snow, I added Marvey Liquid Applique to the roof of each house as well as to the base of each, forming "snow drifts." I sprinkled glitter diamond glitter on the Liquid Applique before heating with my heat tool.

 
I added this to my card base using dimensional adhesive. The sentiment is from the same stamp set. I stamped it, matted it and attached with dimensional adhesives. I ink a couple of chipboard snowflakes from Maya Road with white pigment ink. I added the diamond glitter and attached them to the from of the card as well.

 
I had so much fun making this card. I stared at 10:00 a.m. and next thing I knew it was 1:30. Took quite a bit of time, but well worth it.
 
Thanks for stopping by and happy crafting,
Dana Desmond

Thursday, September 6, 2012

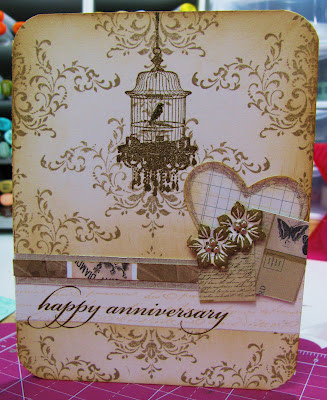
STAMPtember Anniversay Card

Just a quick post to share a card I made using mostly stamps and plain cardstock. The base of the card is Very Vanilla cardstock from Stampin' Up. I stamped the background using a stamp from the Bliss set from Stampin' Up and used ink to distress the edges of the card.

 
The bird cage is from a My Mind's Eye stamp set I received in a Simon Says Stamp card kit. I think it's called Charming, but not sure.

 
The sentiment is a from a Simon Says Stamp set and the patterned paper is from My Mind's Eye. Both were also part of a Simon Says Stamp card kit.

 
I punched the heart from a piece of patterned paper and outlined it with a Sakura Stardust gel pen. I stamped the flowers from the same Bliss stamp set, cut them out and used a stylus on the back of the flowers to curve the petals backward to give them dimension. I added cream pearls from CTMH. The patterned paper behind the flowers are scraps from one of the pieces of patterned paper.
 
 
This card style is a little different for me. I typically don't stamp the background, but I enjoyed making it and will definitely try this again.
 
Thanks for stopping by and happy crafting,
Dana Desmond

Monday, September 3, 2012

Celebrating My Favorite Holiday with a Mojo Monday Challenge

My most favorite holiday of the year, HALLOWEEN. Maybe its because I'm an October baby or possibly because it's so darn FUN! Either way, I love to make Halloween cards. Unfortunately, Halloween isn't a huge card giving holiday.  
 
So, I'm always looking for a good reason to do a Halloween project and when I opened my e-mail this morning and got a look at this week's Mojo Monday sketch, I knew that was the perfect reason.


Since I was a Stampin' Up demonstrator this past year (no longer part of that crew), all of my Halloween supplies are from Stampin' Up. I started by stamping this sweet image from Greeting Card Kids with Momento Tuxedo Black on Copic X-Press It cardstock. I colored it with Copic markers. Using Classic Circles Spellbinders Dies and Classic Scallops Dies, I cut the image, mat and scalloped circle.

 
I followed the sketch pretty closely.


I couldn't find flowers in my stash that were the right color. So, I used a couple of EK Success punches and made my own. The leaves were created using a flower punch from Stampin' Up.


A Sakura Star Dust pen was the perfect tool to add sparkly stars to the night sky. I imaged the light coming from the upper left and figured the highlights wouldn't be too strong because it's night. I'm not the greatest when it comes to light direction, but I'm trying to do a light study on all of my images before I start coloring (biggest thing I learned in my Intermediate Copic Class). 

 
I add another flower and a sentiment (Studio G from Wal-mart).

 
I love how this turned out and will probably take this to work as part of my Halloween decorations.
 
Thanks for stopping by and happy crafting,
Dana Desmond
 
Materials
 
Stampin' Up - Cardstock (Rich Razzelberry, Old Olive, Pumpkin Pie) Patterned Paper, Greeting Card Kids stamp, Rich Razzelberry  Satin Ribbon, Brads
Spellbinders - Classic Circles die, Classic Scallop die
Punches - EK Success Retro Flower Large, Retro Flower Small, Embossed Scallop
Momento Tuxedo Black Ink
Copic Markers
Sakura Star Dust Gel Pen