Showing posts with label Copic. Show all posts

Tuesday, July 21, 2015

Creative Card Crew DT Project Video

Today, I filmed my first process video. I'm slowly getting up the courage to share my work. The video isn't the best, I had a bit of trouble "finding" the camera, especially when I'm showing things up close. Still, not too bad for my first. 

So, my DT submission at Creative Card Crew a A2, top-folding card.

Here is a picture of the finished card. 

As you will see, I added the banners after I made the video. I got so into filming, I forgot the theme of this week's challenge. LOL

The sponsor for challenge #92 Banners/Flags is


A Day for Daisies.

Prize: $12 gift voucher


Now for the video,  (My channel: https://www.youtube.com/user/Time2FlyAway/videos)

I used the Fairy Hello digital image. I printed it on Copic X-Press It Blending Card and colored it using Copic markers. 


The rest of the papers are from the July 2015 Card Kit. The flower is from Michael's and the ribbon is from my stash.

I am planning to make more process videos. I learned a lot making this one. With practice, I'm hoping they get better. If you are a YouTuber, I'm in the market for an inexpensive camera to shoot my videos. I used my iPhone for this one, but I would like to have a camera I can leave in my craftroom. 

I guess, that's about it. Please leave a comment giving me suggestions on how to improve on my next video.

Until then, thanks for stopping by,
Dana

Tuesday, July 7, 2015

Creative Card Crew Challenge 91 Die Cutting

The next challenge at Creative Card Crew is Die Cutting. I own quite a few dies, but for some reason I rarely use them. I used a combination of die sets to create this card. The image is from Morgan Fitzsimons at Morgan's Artworld. I love her designs, especially her portrait images. This digital stamp is called Ragamuffin Kids.


Sponsored by
Prize 3 Digi Images

I used several different mediums for this image. I began by printing the image on heavy weight cardstock. I began by coloring her skin with Copic markers in E0000, E000, and E01.


I then switched to my Zig Kuretake Gansai Tambi watercolors. I painted the rest of the image using this set. Once this was dry, I used the Sakura Gelly Roll pens in metallic, and white to add a bit of dimension to the flowers. I die cut the image and the background yellow piece using Spellbinders Ovals dies and the purple piece using Spellbinders Lacey Ovals.

I then die cut the background layers using MFT Blueprints 1 and 11. I wrapped this with white satin ribbon from my stash. I popped the oval image up on the card with foam tape.


I found this flower in my stash. I made it several years ago using my Silhouette Cameo. It had a blue center, but I removed the brad and replaced it with pink to match the rest of the card.


I wanted to use my Wink of Stella Clear Glitter Pen to add shimmer to the flowers, but it was completely empty. Guess I need another one. Other than that, I was pleased with the card overall. My water coloring skills could use a bit of practice, but it turned out pretty nice.

I hope to see your creations over at our Creative Card Crews challenge blog. Until then, thanks for stopping by and happy crafting.

Dana

Tuesday, June 9, 2015

Creative Card Crew Challenge #89 White on White

Our next challenge over at Creative Card Crew is White on White. You can use only white with no image or have the image be the only color on the card. I chose the latter.


The White on White Challenge is Sponsored by,


I began by printing this beautiful Sabrina image by Saturated Canary on Copic X-Press It Blending Card. I colored the image using Copic Markers. Since the image only had a couple of dots for the nose, I tried a new technique that indicates the bridge of the nose with the light coming from in front of the image. I even impressed my self, it wasn't as hard as it looks. I really like the results.


I embossed the base card using a Cuttlebug folder that has clean strips. I cannot find the name of the folder anywhere. If I do, I will link it below.


I die cut the image using Spellbinders Twenty. I used various dies to cut all of the other components (see supplies list below).


I used the flower dies from MFT's Blueprints 5 to cut multiple flowers. I stacked them and added a pearl brad from The Paper Studio. 


Honestly, I was a bit intimidated by this challenge. I've never attempted a one color card. These types of cards rely on texture to make them pop. I'm not sure if my first attempt was the best, but I love it.

Please join us for the White on White challenge over at Creative Card Crew. Until then, thanks for stopping by and happy crafting.

Dana Desmond

Products List

Tuesday, May 26, 2015

Creative Card Crew Challege #88 Teen

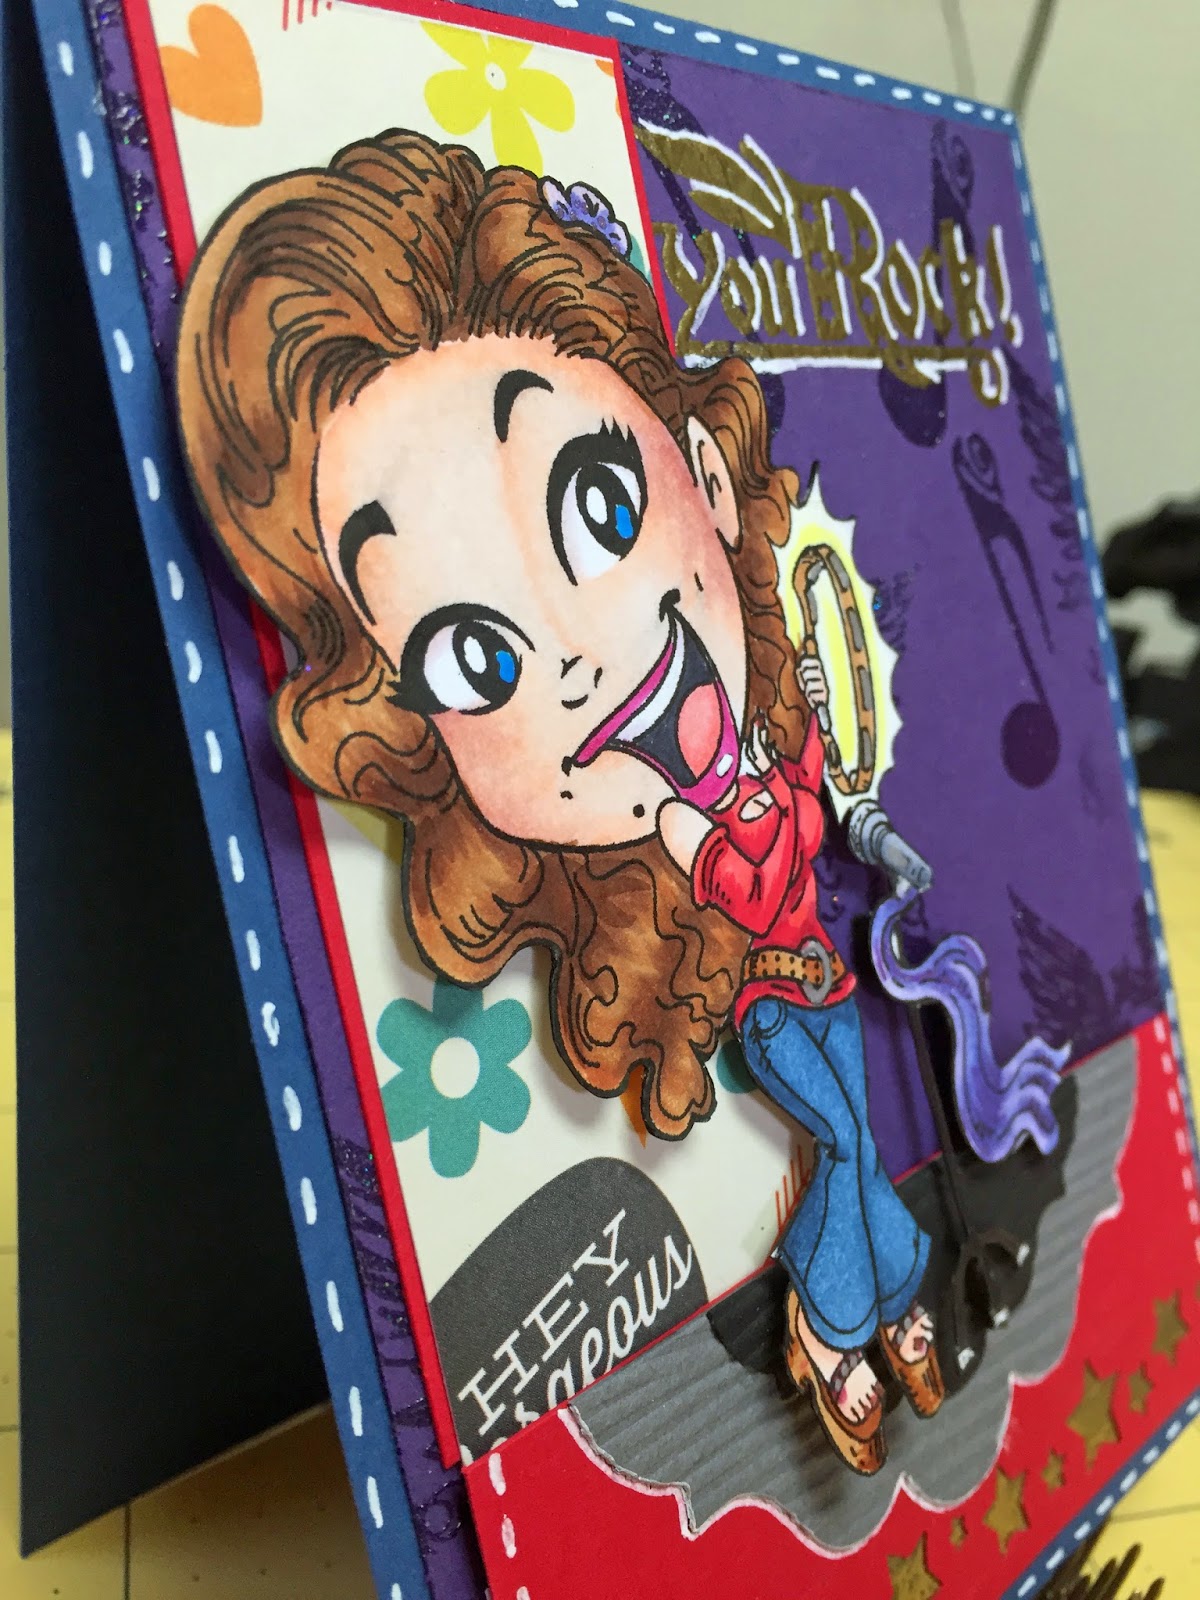
Creative Card Crew challenge #88 is a teen theme. At first this challenge threw me. I had no idea what to do for a Teen project. It seems all my teen does is text, listen to music, and play video games.

Then I ran across the ElenaK digi image and decided this is perfect; heavens knows my son would give anything to be a Rockstar.


Our Challenge Sponsor
Kenny K Downloads


Prize: 3 Digi's


I began by printing the image and coloring her with Copic markers and adding accents with my Sakura Gelly Roll pens. I fussy cut the image and set it aside while I assembled the rest of the card.


I used patterned paper from the Hey Kid paper stack by Pink Paislee. For the background, I used Ranger's Clear and Gold Embossing Powder and the Rockstar stamp set from Inkadinkado. I highlighted the sentiment with my Signo Uni-ball gel pen.


I used a EK Success punch and backed the open spaces with Scor-pal tape. I filled the star-shaped holes with gold embossing powder and heated it to create an "enamel" feel to the "stage."

I adhered all of the paper components to a purple card base and popped the image p off of the "stage." I finished the card off by adding faux stitching with my Signo Uni-ball white gel pen.

I look forward to seeing your interpretation of the Teen challenge. Thanks for stopping by and happy crafting.

Dana Desmond


Tuesday, May 12, 2015

Creative Card Crew Challenge # 87 Embossing

This fortnight challenge over at Creative Card Crew is to create a paper project using embossing.

I used the Berry Sundae image set from Sparkle N Sprinkle for my card.


#87 Embossing - Wet or Dry

Our sponsor for this challenges is 

Prize: Up to $15 in Digi's


I began by printing the image and sentiment on a piece of Simon Says Stamp #120 cardstock and colored it with Copic markers. This digi set has many sentiments that work perfectly with this image.I then used my Signo Uni-ball white gel pen to add highlights to the image. 

Using an old paint brush, I lightly coated the "glass" portions of the image with Diamond Stickles.
Since the Stickles was a thin layer, it dried very quickly, allowing me to add a coat of Glossy Accents over the area.


Using a Spellbinders die, I cut the image piece, a brown mat layer, and a cream piece of index cardstock. I dry embossed the index layer using the Swirls embossing folder from Cuttlebug. I thought this pattern coordinated well with the swirl of the pudding.

I then embossed a Lavender Moon piece of cardstock from Papertrey Ink, using the Swiss Dots embossing folder, also by Cuttlebug. I wet embossed the edges of a piece of white cardstock using 1/4" Scor-pal tape and Rangesr's Enchanted Gold embossing power. The creamy color of the embossing folder coordinates well with the creamy color of the pudding and it adds a bit more sparkle to the card. 

I added the the Lavender Moon panel to a black cardstock based. I popped the focal image up on foam tape and finished the card off by adding faux stitching with my Sakura Sepia Metallic Gelly Roll Pen.

Please join us over at Creative Card Crew. Your project does not have to be a card, just a paper craft. I look forward to seeing what you create.

Thanks for stopping by and happy crafting.
Dana Desmond

Tuesday, April 28, 2015

86 Fancy Folds

For design project for Creative Card Crew's Fancy Fold challenge, I made a side-step card using the image Mother Moon from A DAY FOR DAISIES digital stamp shop


Our sponsor for this challenge is:
Prize: #12 Gift Voucher

Our challenge for this fortnight is Fancy Folds. My very favorite challenge to view.

We hope that you will join us in designing some amazing projects/cards.


For my design, I started out by coloring the image using Copic markers. 


I fussy cut the image and set it aside to work on my background. The gray paper is from Bo Bunny's Altitude collection. It is actually a winter paper, but I just love how it looks like a night sky with twinkling stars.


I cut cut the side-step card base using Papertrey Ink cardstock. I matted each section with the Bo Bunny paper. I the metal filigree is from Butter Bee Scraps. I backed that piece with DCWV glitter paper. I added a star and rhinestone from my stash. I adhered that to the front of the first panel.


I used a frame sticker from The Paper Studio and backed it with the same DCWV glitter paper. I popped up this metal charm, also from The Paper Studio, in the center of the frame. I adhered all of this to the back panel. 

I popped my colored image up on the main panel and finished the card by adhering more stars and small gems throughout the starry sky.

Thanks for stopping by and please join us over at Creative Card Crew.

Dana Desmond

Thursday, April 16, 2015

Creative Card Crew Challenge #85 Use a Sentiment


I am happy to present my design team project for our next challenge with Creative Card Crew. The image and sentiment are from Image That! by Kris, Wedding Day collection. This digital set comes with several images and sentiments. 

Our challenge for this fortnight is to use a sentiment on your project!

Imagine That!

Prize: 3 Digis


For my card, I colored the image using Copic markers.


I used a C-1 Copic to give the work "Love" a shadow so it would standout from the rest of the sentiment.


I layered the image panel on DCWV Glitter Paper in red. Punched the edge of a Stampin' Up Basic Grey cardstock with a Recollections edge punch. I layered the image piece on the gray cardstock and popped all of this up on a Basic Black cardstock A2 card base. I added roses, rose buds, and leaves from Wild Orchid Craft and my card was finished.

To join in the fun, visit the Creative Card Crew website for details. For now, thank you for stopping by and happy crafting,

Dana Desmond

Tuesday, March 31, 2015

Creative Card Crew Challenge #84 Handmade Flowers


The current challenge for Creative Card Crew is to make a card/project with handmade flowers.

This challenge is sponsored by:


Prize $12 Gift Voucher

Now for my Design Team contribution to this challenge.

I used the Wind in My Hair image for my for my card.


I colored the image using Copic markers. Lately I have been practicing shading and highlighting my images using markers from different color families. The dress uses markers from the BV, V, RV, BG, and G families. Another goal is to get better at coloring pastel images. I this was the perfect project for both.


After the image was colored, I used Sakura Stardust gel pens in rose and pink to add sparkle to the flowers in her dress and the ones blowing around her hair and skirt. I added a few dots with my white gel pen for interest.

I used my new Zig Kuretake Gansai Tambi watercolors to add a background to both the image and the panel under them image. I matted my image on Dark Chocolate cardstock from Papertrey Ink. Added lace from my stash and adhered the layers together, using dimensional adhesive for the image panel.


Know, onto the challenge feature. I wanted to create a simple flower that flowed well with the image, yet would standout. I started with two Hydrangea punches by Martha Stewart. I used an inexpensive 110lb white cardstock for these. I wanted the paper to have tooth, as I planned to watercolor them, but water color paper was too thick.

I used Radiant Rain in Apple Blossom and Periwinkle because they have a beautiful shimmer that I can't really get from just watercolors alone. I watered them down quite a bit to get the perfect shade of pint and purple. I wet my flowers first and then just added drops of Apple Blossom to the edges of each flower, letting it wick to the center. I then added Periwinkle to the centers and let if blend with the Apple Blossom. I was so pleased with the outcome. It is exactly want I wanted.

I shaped each flower using my ball stylus tools, stacked them and added pearls to the centers of each flower. I finished off the clusters with small leaves from Wild Orchid Crafts.

This was such a fun card to make. I really challenged my self to step outside of my comfort zone and I love the results. 

I hope you join in the fun over at Creative Card Crew. You have two weeks to create a project. Hope to see yours there.

Thanks for stopping by and happy crafting,
Dana


Tuesday, March 3, 2015

Creative Card Crew Design Team Member + A Challenge

I am so excited to participate in my first challenge as a Design Team member for the Creative Card Crew. 

As you may know I first started my crafting as a cardmaker. In the last year, I have been exploring other types of crafts. But one thing always remains. My love of cardmaking. Each is a small piece of art intended to make someone else's day a little brighter. 

Challenge #82 Use Green as the Main Color.
The sponsor this week is Marianne Designs

Prize: Surprise!

The images are from Dragon's Lair Designs 


Prize: 5 lb. Gift Voucher


I used the Meet Snitch digital image. I colored the image using Copic markers, which have been quite neglected over the last year. I really enjoyed picking them up again, as they are my most favorite coloring tool.


I used the vintage car as an inspirations for my paper selection. I pulled out my stash of Tattered Times paper stacks from DCWV and pulled out all the green patterns and solids.


I printed the sentiment as the same time I printed the image. I used an MFT tag stack to to cut the sentiment block. I popped that up on foam squares.


I then took the green pearlescent paper from the paper pack and my Fiskars grass edge punch and created a layered grassy area. Using an EK sucess punch and my McGill stylus tools, I created the flowers and added pearls from CTMH.


You can participate in this week's challenge too. Details can be found on Creative Card Crew's web page. Be sure to look at all of the other design teams' inspirational projects while you are there.


I want to thank everyone at http://creativecardcrew.blogspot.com/ for making me feel so welcome. I can't wait to work with you to bring the love of cardmaking to others.

Thanks for stopping by and happy crafting,
Dana Desmond

Friday, December 12, 2014

2014 Christmas Card #7

~~Don't forget about my 200,000 blog hit giveaway, win a~~~
$25 Simon Says Stamp Gift Card (See details here). 

I know I said yesterday's card was my favorite, but this one is so adorable, I'm rethinking that statement. This card again uses the Simon Says Stamp November Card Kit and Lawn Fawn's Sweet Christmas stamp set. I have made tons of cards with this kit and I have plenty of supplies left to make a few more. I haven't even started using the December Card Kit yet. I forgot how great a deal these kits are.


I stamped the all the images on Copic X-Press It cardstock in my new MFT Black Licorice Hybrid ink and colored them with my Copics.

I have been using the Momento Tuxedo Black ink for my Copic coloring for years, but I had a hard time getting a true crisp black. The MFT Hybrid inks work very well with Copic and the images are solid, crisp black. I'm so glad I listed to Amy over at Prairie, Paper, and Ink. She made the switch and I could definitely see the difference in her videos.


I white heat embossed the snowflake from this set above the house and created a winter sky using Distress Ink in Broken Chine, Peacock Feather, and Evergreen Bough.

I cut a bunch of patterned paper rectangles and mattes. I rounded all the corners with my Corner Chomper and layered all the mattes to the background. I Heat embossed the sentiment on a piece of patterned paper and trimmed it out using the MFT Wavey Borders die on the bottom. Using my Corner Chomper, I rounded the top right corner of the sentiment strip.


I fussy cut all of the Gingerbread people and the tree. I adhered the images and the sentiment strip tot he card using foam adhesive. I added stitch lines using my Signo Uniball Gel pen. I first thought I would add a solid white frame, but with all of my images, it got lost. I don't really like the solid lines, but I wasn't wasting a piece of quality cardstock, so I went with it.


I add glossy accents to the buttons on the Ginger People and accented the card using more of the My Mind's Eye Jubilee enamel accents from the kit (I've used tons of these and I still have a bunch left).

I hope you enjoyed today's card. I had a lot of fun coloring these images. I'm on the lookout for fun, non Holiday, images to color. I think I've colored everything in my stash. Any suggestions would be greatly appreciated.

Have a wonderful day and happy crafting.
Dana

Tuesday, December 9, 2014

2014 Christmas Card #4


~~~Don't forget about my 200,000 blog hit giveaway, win a~~~
$25 Simon Says Stamp Gift Card (See details here). 

Today's card features products from the Simon Says Stamp November Card Kit. It is a standard A2 card using patterned paper from the card kit. The paper is Snow Day by Lawn Fawn.


I stamped the tree image and all of the ornaments from Lawn Fawn's Trim the Tree stamp set onto Copic X-Press It Blending Card. I colored the tree and each ornament with Copic Markers. I used an awesome holiday stamp by Stampendous called Holiday Words to create the sentiment. What I love about this set is that all the words are separate, yet each has it's own character that allows you to build interesting sentiments. 


I fussy cut each ornament and adhered it to the tree. I set this aside and cut the background piece with one of my Spellbinders Label Nestabilities dies. I used my white Signo Uniball pen to add stitching. Next, I added the strip of beautiful snowflake paper to the left side of the card.


Using my Sakura Stardust gel pen, I add a bit of shimmer to the ornaments and a few Sakura Metallic pens to add "lights" to the tree.


I finished off by adding sequins trailing down the left side. These are also from the Simon Says Stamp Card Kit and faux stitching around the sentiment using the blue Metallic Sakura pen.

This was my first time using many of these products and I love them. 

I hope you have a wonderful day and happy crafting,
Dana